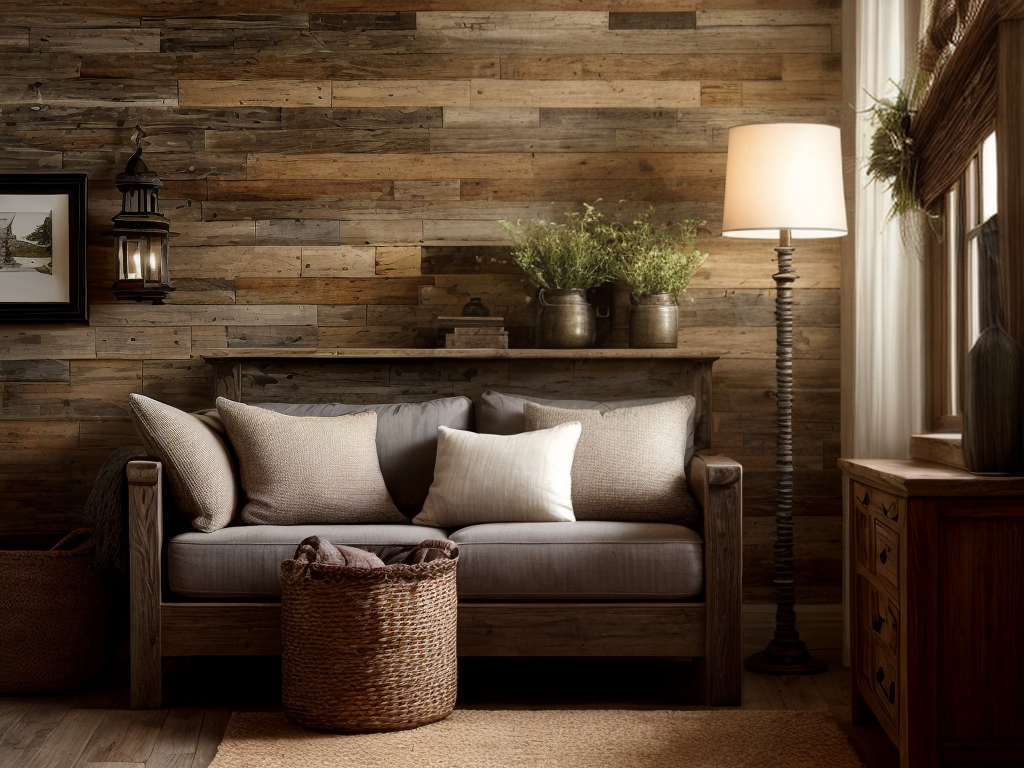
Welcome, friends, to our step-by-step guide on creating a rustic accent wall! Have you ever walked into a cozy cabin or a charming farmhouse and felt an instant sense of belonging? Well, now you can bring that warm, rustic charm into your own home with a stunning accent wall. In this guide, we will take you through each stage of the process, from choosing the right materials to adding those final finishing touches. Together, we will transform your space into a haven of comfort and style. So, grab your tools and let’s embark on this journey of creating a rustic accent wall that will make you feel right at home. Let’s get started!
Choose the Right Materials
First, we need to decide on the materials we will use for our rustic accent wall. Selecting the right wood type is crucial in achieving the desired aesthetic. We want a wood that exudes warmth and natural beauty, such as reclaimed barn wood or distressed pine. These choices not only add character but also contribute to the cozy and inviting atmosphere we want to create. Alongside the wood type, finding the perfect color palette is essential. Earth tones like warm browns, muted grays, and creamy whites work best for a rustic look. These colors evoke a sense of nostalgia and harmony with nature. By carefully selecting the wood type and color palette, we can create a rustic accent wall that truly reflects our desire for a space that feels like home.
Prepare Your Wall Surface
Now that we have chosen the right materials, let’s move on to preparing our wall surface. The first step is to clean the wall using various techniques to ensure a smooth and dust-free surface. Next, we need to choose the right paint that will complement our rustic theme and provide the desired texture. By following these steps, we can create a stunning accent wall that adds warmth and character to any space.
Wall Cleaning Techniques
Before beginning the process of creating a rustic accent wall, it is essential to prepare the wall surface by employing effective wall cleaning techniques. Here are a few steps to help you get started:
- Clear the clutter: Remove any furniture or decorations from the wall area to make cleaning easier.
- Dust and vacuum: Use a soft cloth or duster to remove dust and cobwebs from the surface. Then, vacuum the wall to get rid of any loose dirt or debris.
- Wash the wall: Mix a mild detergent with warm water and use a sponge or cloth to gently scrub the wall. Pay attention to any stains or marks, and make sure to rinse the wall thoroughly afterward.
- Repair and patch: Check for any cracks, holes, or imperfections on the wall surface. Use a putty knife and spackling compound to fill in any gaps, and sand the area smooth once it’s dry.
Choosing the Right Paint
To ensure a successful rustic accent wall, we need to carefully select the right paint for our prepared wall surface. Color selection plays a crucial role in creating the desired rustic look. Earthy tones like warm browns, deep reds, and muted greens can bring a cozy and natural feel to the space. Consider the existing color scheme and the overall ambiance you want to achieve when choosing the paint color. Additionally, paint finishes are important in enhancing the rustic aesthetic. Opt for matte or eggshell finishes as they provide a subtle texture and a softer appearance. These finishes also help to hide imperfections on the wall surface, giving it a more rustic and weathered look. By paying attention to color selection and paint finishes, we can create a captivating rustic accent wall that adds warmth and charm to our space.
Applying Texture Techniques
We carefully prepare our wall surface by applying texture techniques. This step is crucial in creating a rustic accent wall that exudes warmth and charm. Here are some best practices and texturing options to consider:
- Knockdown Technique: Using a trowel, we apply joint compound to the wall and then gently knock down the peaks with a drywall knife. This creates a subtle texture that adds depth to the wall.
- Skip Trowel Technique: By applying joint compound with a trowel and then lightly skipping it across the surface, we create a unique texture that resembles the look of stucco.
- Brush Technique: With a stiff-bristled brush, we create vertical or horizontal strokes on the wall’s surface. This technique adds a rustic, weathered appearance.
- Sponge Technique: By dabbing a damp sponge onto the wall, we achieve a mottled effect that mimics the natural texture of stone or brick.
Measure and Mark Your Wall
Let’s talk about the important points when it comes to measuring and marking your wall. First, we’ll cover the proper techniques for preparing your wall, ensuring a smooth and even surface. Next, we’ll discuss the essential tools you’ll need to get the job done right, from measuring tapes to chalk lines. Finally, we’ll share some helpful tips to ensure accurate measurements, so you can create a rustic accent wall that fits perfectly in your space.
Wall Preparation Techniques
Accurate measurement and precise marking are essential steps in preparing the wall for a rustic accent makeover. Before diving into the fun part of creating a rustic accent wall, it’s important to ensure that the wall is in good condition and ready for the transformation. Here are some wall preparation techniques to consider:
- Inspect the wall: Look for any cracks, holes, or imperfections that may need repair before starting the project.
- Repair any damage: Use wall repair techniques such as filling cracks with spackle or patching holes with putty to create a smooth surface.
- Clean the wall: Remove any dirt, dust, or grease from the wall using a mild detergent and water solution.
- Prime the wall: Apply a coat of primer to create a proper base for the accent wall paint, ensuring better adhesion and a longer-lasting finish.
Choosing the Right Tools
To measure and mark our wall accurately, we will need the right tools. Tool selection is crucial in ensuring a successful rustic accent wall project. The equipment needed includes a measuring tape, level, pencil, and painter’s tape. These tools will help us achieve precise measurements and straight lines, resulting in a professional-looking accent wall. A measuring tape allows us to accurately measure the dimensions of the wall and determine the placement of the accent pieces. A level ensures that our marks are straight and aligned, preventing any unevenness in the final result. A pencil is essential for marking the measurements and guidelines on the wall. Lastly, painter’s tape helps us create crisp and clean lines when painting the accent wall. With the right tools in hand, we can confidently proceed to the next step of our rustic accent wall project.
Tips for Accurate Measurements
Now that we have the necessary tools, we can ensure precise measurements and guidelines for our rustic accent wall project. To achieve accurate measurements, we need to use the right measuring tools and techniques. Here are some tips to help you measure and mark your wall with precision:
- Tape Measure: Use a sturdy tape measure to measure the length and height of your wall.
- Level: A level will help you ensure that your marks are straight and aligned.
- Pencil: Use a sharp pencil to mark your measurements on the wall.
- Masking Tape: Applying masking tape along your marks will create a clear guideline for your accent wall.
Install the Wood Planks
How do we install the wood planks for our rustic accent wall? The installation of wood planks is an essential step in creating a cozy and inviting atmosphere. There are various wood plank techniques that can be used to achieve the desired look. First, ensure that the wall is clean and free from any debris. Next, apply adhesive to the back of each plank and press firmly onto the wall, starting from the bottom and working your way up. Use a level to ensure that the planks are straight and even. If necessary, trim the planks to fit using a saw. Finally, secure the planks in place with nails or screws for added stability. By following these wood plank installation techniques, you can create a stunning rustic accent wall that adds warmth and character to your space.
Stain or Paint the Wood
After installing the wood planks, we can now move on to staining or painting the wood for our rustic accent wall. Here are some wood staining techniques and wood painting tips to help you achieve the perfect look:
- Stain it for a natural finish: Apply a wood stain in a color that complements your desired rustic aesthetic. Allow the stain to penetrate the wood for a rich and warm look.
- Distress it for an aged appearance: Use sandpaper or a wire brush to create intentional imperfections on the wood surface. This will give it a weathered and worn-out look, adding to the rustic charm.
- Paint it for a pop of color: If you prefer a more vibrant and eye-catching accent wall, consider painting the wood. Choose a paint color that contrasts with the surrounding decor to make it stand out.
- Combine stain and paint for a unique effect: Get creative by using both stain and paint on different parts of the wood planks. This will add depth and dimension to your rustic accent wall, making it truly one-of-a-kind.
Seal and Protect the Accent Wall
To ensure the longevity and durability of our rustic accent wall, we need to seal and protect it. By applying a sealant, we can safeguard the wood against moisture, dirt, and other potential damages. There are several sealant options available, such as polyurethane, varnish, or even natural oils like linseed or tung oil. These sealants not only provide a protective barrier but also enhance the natural beauty of the wood. When applying the sealant, make sure to follow the manufacturer’s instructions and apply multiple coats for maximum protection. Additionally, it’s important to regularly maintain the accent wall by cleaning it with a mild detergent and soft cloth, avoiding harsh chemicals that can strip away the sealant. By taking these maintenance tips into consideration, we can ensure that our rustic accent wall remains a beautiful and cherished addition to our space.
Add Finishing Touches
Once we have sealed and protected our rustic accent wall, we can now move on to adding the finishing touches. These small details will enhance the overall look and feel of our accent wall design, bringing out the rustic charm we desire. Here are some rustic decor ideas to consider:
- Hang a vintage-inspired mirror with a weathered wooden frame to create a focal point on the accent wall.
- Place a collection of antique candle holders on a floating shelf, casting a warm and cozy glow in the room.
- Add a touch of nature by arranging a few dried flowers or branches in a rustic vase on a side table.
- Display a unique piece of artwork, such as a hand-painted wooden sign or a framed vintage map, to add visual interest and personal flair.