Are you tired of your old, drafty windows? Looking to add a touch of timeless elegance to your home? Installing traditional wooden windows may be the solution you’ve been searching for. In this DIY guide, I will walk you through the step-by-step process of installing wooden windows, from assessing your window needs to troubleshooting common installation issues. With the right tools, materials, and techniques, you can transform your space and enjoy the beauty and benefits of traditional wooden windows. So, let’s get started on this exciting journey towards enhancing your home’s aesthetic appeal and energy efficiency.
Assessing Your Window Needs
When assessing your window needs, it is crucial to carefully evaluate the functionality and aesthetic preferences that will guide your installation process. Choosing window treatments and maintaining window hardware are two key aspects that require your attention.
Firstly, when it comes to choosing window treatments, it is important to consider the purpose of the room and your desired level of privacy and light control. Options such as curtains, blinds, shades, or shutters offer different benefits. Curtains provide a classic and versatile look, while blinds offer precise light control. Shades are an excellent choice for creating a softer ambiance, and shutters provide a timeless and elegant aesthetic. Consider the style and functionality that aligns with your personal taste and the overall design of your space.
Secondly, maintaining window hardware is essential for ensuring the longevity and smooth operation of your windows. Regular cleaning and lubrication of window hinges, handles, and locks will prevent rust and promote easy opening and closing. Inspect the weatherstripping and seals to ensure they are in good condition, as this will help with energy efficiency and prevent drafts.
Gathering the Necessary Tools and Materials
To gather the necessary tools and materials for installing traditional wooden windows, I recommend creating a comprehensive checklist to ensure you have everything you need. This will help you stay organized and prevent any unnecessary delays during the installation process. When gathering materials, it is important to select high-quality materials that are suitable for your specific window type and size. Traditional wooden windows require materials such as wooden frames, glass panes, putty, screws, nails, and sealant. It is crucial to choose materials that are durable, weather-resistant, and provide good insulation to ensure the longevity and energy efficiency of your windows.
When it comes to selecting tools, you will need a few essential items. A tape measure is crucial for accurately measuring the dimensions of your windows, ensuring a proper fit. A level will help you align the windows correctly, avoiding any unevenness. A screwdriver, hammer, and power drill are essential for assembling and securing the window frames. Additionally, you may need a chisel for removing old putty and a pry bar for removing existing windows.
To ensure your safety during the installation process, it is important to wear protective gear such as safety goggles and gloves. These will protect you from any potential hazards while handling tools and materials. Lastly, don’t forget to have a clean cloth or sponge on hand to clean any excess putty or sealant.
Measuring the Window Frame Accurately
I highly recommend accurately measuring the window frame to ensure a proper fit for your traditional wooden windows. Taking precise measurements is crucial for a successful window installation. To help you with this process, I will share some measuring techniques and common measurement mistakes to avoid.
First, let’s discuss the measuring techniques. Use a measuring tape to measure the width and height of the window frame. Start by measuring the width at the top, middle, and bottom of the frame, and record the smallest measurement. Repeat the same process for the height, measuring from the left, center, and right side. This ensures that you account for any irregularities in the frame.
Now, let’s address some common measurement mistakes. One mistake is failing to measure the frame accurately, resulting in ill-fitting windows that may lead to air leaks and energy loss. Another mistake is not allowing for enough clearance for window sashes to open and close properly. It’s essential to consider these factors when measuring your window frame.
To help you visualize the importance of accurate measurements, here’s a table showing the potential consequences of incorrect measurements:
| Measurement Mistake | Consequence |
|---|---|
| Inaccurate width measurement | Poorly fitting window, potential air leaks |
| Inaccurate height measurement | Difficulty opening and closing window sashes |
| Insufficient clearance measurement | Restricted functionality of the window |
| Uneven measurements | Unbalanced appearance, difficult installation |
Removing the Old Window and Preparing the Opening
Now that you have accurately measured the window frame, it is time to move on to the next step of removing the old window and preparing the opening. Before starting, make sure you have all the necessary tools and equipment, such as a pry bar, screwdriver, and safety goggles.
The first thing you need to do is remove the hardware from the old window. This includes any screws, nails, or hinges that are holding it in place. Use a screwdriver or pry bar to carefully remove these components, being cautious not to damage the surrounding area.
Once the hardware is removed, it’s time to seal the window opening. This is an important step to prevent any drafts or water leaks in the future. Start by inspecting the opening for any signs of damage or rot. If you notice any issues, make the necessary repairs before proceeding.
Next, apply a bead of caulk around the perimeter of the window opening. This will create a seal between the window frame and the opening, preventing any air or water from entering. Be sure to use a high-quality caulk that is suitable for exterior use.
After applying the caulk, insert the new window into the opening and secure it in place according to the manufacturer’s instructions. Use screws or nails to secure the window, making sure it is level and square.
With the old window removed and the opening properly sealed, you are now ready to move on to the next step of the installation process. Stay tuned for the next subtopic, which will cover the installation of the new window.
Choosing the Right Wooden Window Style
When selecting a wooden window style, consider the architectural design and aesthetic of your home to ensure a cohesive and visually pleasing look. Here are four important factors to consider when choosing the right wooden window style for your home:
-
Window Type: Determine the type of window that best suits your needs and complements the architectural style of your home. Common options include casement, double-hung, awning, and sliding windows. Each type offers unique benefits and can be customized to fit your preferences.
-
Size and Proportions: Consider the size and proportions of the windows in relation to the overall design of your home. Ensure that the window size is balanced and proportionate to the surrounding elements, such as the walls and other architectural features.
-
Design Details: Pay attention to the design details of the wooden window, such as the frame style, muntins (divided panes), and hardware. These details can significantly impact the overall look and feel of your windows. Choose a design that complements the style of your home and adds character to the windows.
-
Maintenance: Consider the maintenance requirements of the wooden windows. Opt for a style that is easy to clean and maintain, as this will help prolong the lifespan of your windows. Additionally, consider the type of finish or treatment that will be applied to the wood to protect it from the elements and ensure its longevity.
Preparing the Window for Installation
Before installing the traditional wooden window, there are a few important steps to take. First, carefully measure the window opening to ensure the new window will fit properly. Next, remove the old window, taking care to disconnect any hardware or trim. Finally, prepare the window frame by cleaning it thoroughly and making any necessary repairs. These steps are essential in ensuring a successful window installation.
Measure Window Opening
To properly prepare the window for installation, accurately measuring the window opening is crucial. Here’s a step-by-step guide to ensure measuring accuracy and determine the correct window opening dimensions:
-
Gather your tools: You’ll need a measuring tape, pencil, and paper to record your measurements.
-
Measure the width: Start at the inside edge of the window frame on one side and measure across to the other side. Take three measurements at different points and use the smallest measurement as your width.
-
Measure the height: Begin at the top inside edge of the window frame and measure down to the window sill. Again, take three measurements and use the smallest one as your height.
-
Double-check your measurements: Verify that the width and height measurements are accurate before proceeding with the installation.
Remove Old Window
I recommend starting by carefully removing the old window to prepare for the installation process. Before you begin, gather the necessary tools such as a pry bar, utility knife, and safety goggles. First, remove any window coverings or hardware. Then, use the utility knife to cut through any caulking or paint around the window frame. Next, carefully pry off the trim and sash using the pry bar, taking care not to damage the surrounding wall. Once the trim and sash are removed, you can access the window frame. Depending on the type of window, you may need to use different removing techniques. Finally, consider disposal options for the old window, such as recycling or donating it to a local organization. Remember to follow local regulations for proper disposal.
Prepare Window Frame
To prepare the window frame for installation, it is crucial to ensure it is clean, smooth, and structurally sound. Here are the steps to follow for proper window frame preparation:
-
Clean the frame: Remove any dirt, dust, or debris from the frame using a brush or vacuum cleaner. This will ensure a clean surface for the next steps.
-
Repair any damages: Inspect the frame for any cracks or rot. Repair or replace any damaged parts to ensure the frame is structurally sound.
-
Seal the frame: Apply a high-quality sealant or caulk around the edges of the frame to prevent air and water leakage. This will improve energy efficiency and protect against moisture damage.
-
Smooth the surface: Sand any rough areas on the frame to create a smooth surface for painting or staining.
Installing the Window Frame
Before proceeding with the installation process, it is essential to carefully measure and prepare the opening for the window frame. Once you have completed the preparation, you can begin installing the window frame. This step is crucial as it ensures the stability and proper functioning of your traditional wooden windows.
To start, position the window frame in the opening, making sure it is centered and level. Use shims to adjust the frame if necessary, ensuring a secure and plumb fit. Once the frame is in place, secure it by driving screws through the frame and into the surrounding wall studs. Be sure to use screws specifically designed for window frame installation to ensure a strong and durable hold.
When framing the window, it is important to consider the type of window you have and the surrounding structure. For example, if your window is a double-hung window, you will need to install a support header above the frame to distribute the weight evenly. This header can be made of wood or another suitable material.
Additionally, you may need to use framing techniques such as adding cripple studs or blocking to provide additional support and stability. These techniques help prevent any movement or warping of the window frame over time.
Once the window frame is securely in place, check for any gaps between the frame and the opening. Fill these gaps with insulation foam to improve energy efficiency and prevent drafts.
Securing the Window in Place
Now that the window frame is securely in place, the next step is to ensure that the window itself is properly secured in the frame. This is an essential part of the installation process as it ensures that the window remains in place and functions effectively. Here are some securing methods and window fasteners that you can use to achieve this:
-
Sash Locks: These are the most common type of window fasteners used to secure the window in place. They consist of a latch that locks the window sashes together, preventing them from opening or closing unintentionally. Sash locks are easy to install and provide a reliable way to secure your windows.
-
Casement Stays: If you have casement windows that open outward, casement stays are an excellent option. These devices are attached to the window frame and allow you to secure the window in different positions. They provide added security by preventing the window from being forced open from the outside.
-
Window Bolts: Window bolts are another effective securing method that can be used on various types of windows. These bolts are installed on the side or top of the window frame and can be engaged or disengaged to lock or release the window. Window bolts provide a strong and secure fastening option.
-
Keyed Locks: For enhanced security, you can consider installing keyed locks on your windows. These locks require a key to open, providing an additional layer of protection against unauthorized entry. Keyed locks are available in different styles and can be installed on both casement and sliding windows.
Insulating and Weatherproofing the Window
Insulating and weatherproofing the window is crucial to ensure energy efficiency and protect against drafts and moisture infiltration. When it comes to traditional wooden windows, there are several insulating techniques and weatherproofing methods that you can employ to maximize the performance of your windows.
One effective insulating technique is the use of weatherstripping. Weatherstripping involves applying a seal to prevent air leakage around the window frame. This can be done using adhesive-backed foam tape, V-strip, or door sweeps. By sealing any gaps or cracks, you can prevent drafts and keep your home comfortable.
Another insulating method is the use of window film. Window film is a thin, transparent layer that can be applied to the glass surface. It acts as an additional barrier against heat loss and gain. Look for window films with low emissivity (low-E) coatings, as they can reduce heat transfer and improve energy efficiency.
Additionally, adding insulation to the window cavities can further enhance insulation. This can be done by injecting expanding foam insulation or using fiberglass batt insulation. These materials help prevent heat loss and reduce noise transmission from outside.
In terms of weatherproofing, caulking is an important step. Apply caulk around the window frame to seal any gaps or cracks that may allow water or air to penetrate. Be sure to choose a high-quality, waterproof caulk that is appropriate for exterior use.
Lastly, consider installing storm windows. Storm windows provide an extra layer of protection against the elements and can significantly improve insulation. They can be easily installed and removed as needed.
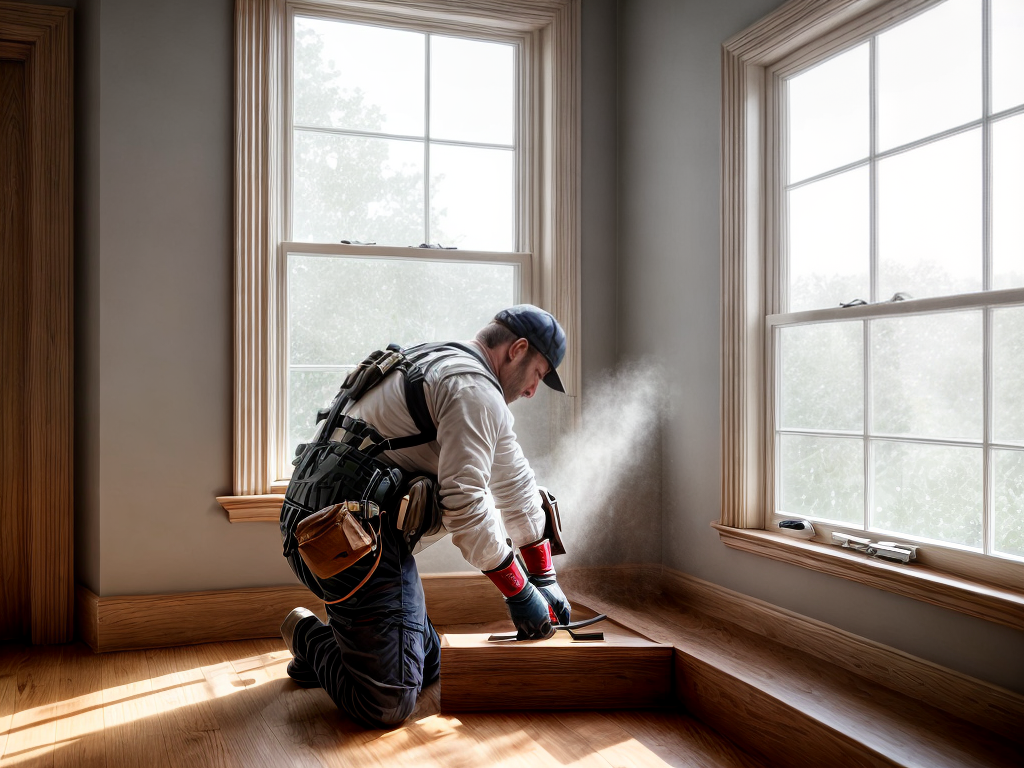
Adding Trim and Finishing Touches
To complete the installation of traditional wooden windows, it is important to add the finishing touches and trim that will enhance the overall appearance and functionality of the windows. Here are some key steps for trim installation and finishing techniques:
-
Choose the right trim: Select trim that matches the style of your windows and complements the overall aesthetic of your home. Consider materials such as wood, PVC, or composite for durability and low maintenance.
-
Measure and cut: Measure the length and width of the window frame accurately before cutting the trim. Use a miter saw or a coping saw to make precise cuts at a 45-degree angle for seamless corners.
-
Attach the trim: Apply construction adhesive to the back of the trim and place it along the edges of the window frame. Use finishing nails to secure the trim in place, ensuring a tight fit. Fill any gaps or nail holes with wood filler and sand it smooth for a seamless finish.
-
Apply a protective finish: Apply a protective finish, such as paint or stain, to the trim. This not only enhances the appearance but also protects the wood from moisture and UV damage. Ensure proper ventilation and follow the manufacturer’s instructions for application and drying times.
Adding trim and finishing touches to your traditional wooden windows not only adds visual appeal but also protects them from the elements. By following these trim installation steps and finishing techniques, you can achieve a professional-looking result that will enhance the beauty and functionality of your windows for years to come.
Painting or Staining the Wooden Window
When painting or staining the wooden window, it is essential to choose a high-quality product that will provide long-lasting protection and enhance the natural beauty of the wood. Properly painting or staining your wooden window will not only protect it from the elements but also give it a polished and finished look.
Firstly, when it comes to painting techniques, it is important to prepare the surface properly. Start by sanding the window to create a smooth and even surface. Remove any old paint or stain, and fill any cracks or holes with wood filler. After sanding, wipe the window clean to remove any dust or debris.
Next, choose the right paint or stain for your wooden window. Look for a product that is specifically designed for exterior wood surfaces and offers UV protection. This will help prevent fading and damage from the sun’s rays. Additionally, opt for a product that is water-resistant to protect against moisture and rot.
When applying the paint or stain, make sure to follow the manufacturer’s instructions. Use a brush or roller to evenly coat the window, applying multiple thin layers rather than one thick coat. This will ensure better adhesion and a more professional finish. Allow each layer to dry completely before applying the next.
Installing Window Hardware and Accessories
Now that the wooden window has been painted or stained, it is time to move on to the next step of installing the window hardware and accessories. This is an important step in completing the installation process and ensuring the functionality and security of your wooden windows. Here are some tips for installing window accessories:
-
Choose the right window hardware options: There are various window hardware options available in the market, such as locks, handles, hinges, and stays. Consider the style and design of your wooden windows and choose hardware that complements them. It is also essential to select hardware that is durable and weather-resistant for long-lasting performance.
-
Measure and mark the placement: Before installing the window accessories, carefully measure and mark the exact placement on the window frame. This will ensure that the accessories are installed correctly and function properly.
-
Follow the manufacturer’s instructions: Each window accessory may have specific installation instructions provided by the manufacturer. It is crucial to read and follow these instructions carefully to ensure proper installation and avoid any damage to the window or the accessory itself.
-
Secure the accessories firmly: When installing window accessories, make sure to secure them firmly to the window frame. This will prevent any rattling or movement of the accessories and ensure their stability and functionality.
Cleaning and Maintaining Your Wooden Windows
Maintaining the cleanliness of your wooden windows is essential in preserving their beauty and longevity. To properly clean them, use mild, non-abrasive cleaners and a soft cloth. Additionally, taking preventive measures such as sealing the wood and regularly inspecting for signs of rot can help ensure your windows stay in excellent condition for years to come.
Proper Cleaning Techniques
To properly clean and maintain your wooden windows, it is essential to follow a few simple techniques. Here’s how:
-
Start by dusting the windows using a soft brush or cloth to remove any loose dirt or debris. This will prevent scratching the wood during the cleaning process.
-
Mix a solution of mild soap and warm water. Dip a sponge or cloth into the solution and gently scrub the window frames and glass. Avoid using harsh chemicals or abrasive cleaners that can damage the wood.
-
Rinse the windows thoroughly with clean water to remove any soap residue. Use a squeegee or a lint-free cloth to dry the glass and prevent streaks.
-
Apply a protective coating, such as a wood sealant or varnish, to the window frames every few years. This will help preserve the wood and maintain its appearance.
Preventing Wood Rot
After properly cleaning and maintaining your wooden windows, it is crucial to take preventative measures to avoid wood rot. Wood rot can be a major problem for wooden windows, causing decay and weakening the structure over time. To prevent wood rot, there are several window maintenance techniques you can employ. Firstly, ensure that your windows are properly sealed and painted. This helps to protect the wood from moisture and prevents water from seeping into the window frames. Regularly inspect your windows for any signs of damage or rot, such as soft spots or discoloration. If you notice any issues, address them promptly to prevent further damage. Additionally, make sure that your windows are properly ventilated to reduce moisture buildup. By following these preventative measures, you can prolong the lifespan of your wooden windows and maintain their beauty and functionality for years to come.
Troubleshooting Common Window Installation Issues
Common window installation issues can be easily troubleshooted with the right tools and knowledge. As a DIY enthusiast, I understand the frustration that can come with encountering problems during window installation. However, with a little troubleshooting, you can overcome these issues and ensure a successful installation. Here are some common window installation issues and how to troubleshoot them:
-
Window Leaks: One of the most common issues is water leaking into the window frame. To troubleshoot this problem, check for any gaps or cracks in the window frame and seal them with caulking or weatherstripping. Additionally, make sure the window is properly aligned and securely closed to prevent any water infiltration.
-
Drafts and Air Leakage: If you feel drafts coming from the window, it means there is air leakage. To troubleshoot this issue, check for gaps around the window frame and seal them with weatherstripping or foam sealant. You can also install a window insulator kit to prevent air leakage and improve insulation.
-
Window Alignment: If your window is not opening or closing properly, it may be misaligned. To troubleshoot this issue, check the window tracks and hinges for any obstructions or debris. Clean them thoroughly and lubricate if necessary. If the problem persists, you may need to adjust the window hinges or replace them.
-
Condensation: Excessive condensation on your window can be a sign of poor insulation. To troubleshoot this issue, check for any gaps or cracks in the window frame and seal them with caulking or weatherstripping. You can also consider installing double-glazed windows for better insulation.
Enjoying the Beauty and Benefits of Traditional Wooden Windows
As an avid DIY enthusiast, I’ve successfully troubleshooted common window installation issues, and now it’s time to explore the beauty and benefits of traditional wooden windows. Wooden windows have been a popular choice for centuries due to their timeless appeal and numerous advantages. Let’s take a closer look at the benefits of wooden windows and how to properly maintain them.
| Benefits of Wooden Windows | Maintenance of Wooden Windows |
|---|---|
| Natural Aesthetics: Wooden windows add warmth, charm, and a touch of natural beauty to any home. They can enhance the overall aesthetic appeal of both traditional and modern architectural styles. | Regular Cleaning: To keep wooden windows looking their best, it is important to clean them regularly using a mild detergent and a soft cloth. Avoid using harsh chemicals or abrasive materials that can damage the wood. |
| Energy Efficiency: Wood is a natural insulator, providing excellent thermal performance. This helps to reduce heat loss during the winter and heat gain during the summer, resulting in lower energy bills. | Repainting and Refinishing: Over time, wooden windows may require repainting or refinishing to maintain their appearance and protect them from the elements. It is recommended to repaint or refinish wooden windows every 3-5 years or as needed. |
| Durability and Longevity: High-quality wooden windows, when properly maintained, can last for decades. They are resistant to impact and can withstand extreme weather conditions, making them a durable choice for any home. | Sealing and Weatherproofing: To prevent moisture damage and ensure the longevity of wooden windows, it is crucial to regularly check and repair any gaps or cracks. Applying a weatherproof sealant can also help to protect the wood from the elements. |